7 Steps To Great Technical Blogging That Ranks on Google
Pouring hours into a deeply technical blog post and watching it get two views in two months is its own special demoralisation. The fix isn't writing easier content; it's writing technical content the way Google rewards. Here are seven steps to technical blogging that ranks, starting with long-tail keyword research and ending with the structure search results actually pick up.
On this page
If you’ve ever been super excited about a new technical blog post that you’ve poured hours of time and research into, but then been disheartened when it has only two views in two months.
This post is for you.
Technical blogging can be a very effective marketing strategy because people don’t respond to ‘sales & marketing language. In fact, when searching for information, coming across sales copy will often repel them.
Remember, Google wants to give searchers the best answer to their query – and as a technical expert in your field you are very well positioned to do that.
But to be successful there are several steps you need to get right. In this post I’ll review the 7 steps for technical blogging that ranks higher in Google.
Note that in this post we’re not going to talk about the technology and tools for a blog platform. I’m going to assume you already have a fast provider and robust blogging platform.
Step 1: Find the right long-tail keywords for your technical blog topic
Choose a topic within your area of expertise that you will find easy to write about AND is of interest to your buyer persona. The last part is critical – it must be of interest to your target buyer.
Typically you will be trying to educate your reader. In that process they will also gain trust in your expertise and be more likely to hire your company. This is the core idea behind inbound marketing.
Choosing the right keywords for your post is an entire subject on its own so I’ll point you to this post by Robbie Richards on the topic.
But in summary you can use keyword research tools such as Answer The Public, Moz or SEMRush to get an understanding of:
- The keywords people actually search for (they might not be what you expect).
- How often people search on those keywords (Volume)
- How many other pages are trying to be found for the same keywords (Competition)
- What question people are trying to answer when they search on those keywords (Search Intent)
To increase your chances of ranking, choose long-tail keywords with moderate search volumes and low competition. For example, a SaaS company might look into which “software” related long-tail keywords they should rank for.
A lot of people skip this step and just guess the topics they think are ranking on Google.
This is a first mistake.
As an expert, you see your industry through the eyes of an expert but the terms you might search on are not necessarily the same as the ones your buyer persona uses.
People looking for your services may describe your subject matter differently from you, and you don’t want to lose this valuable audience.
Bonus Tip: Check out Udemy and Amazon for Keyword Ideas
One issue with keywords research is that you need to find keywords that people are searching for in your field.
What if you could not only figure out what they are interested in, but what the people you are targeting are paying for?
This tip from Backlinko suggests that you search the major topics within your industry in Udemy and Amazon.
Then look at the courses and/or books with the most reviews. This will tell you how good the content is and how many people are not only interested, but will pay money to read this content.
When you’ve figured out which books and courses are at the top of the game. Review the content for blog post ideas and keywords.
Step 2: Write five subheadings for a winning technical blog post
You may decide to have more than five subheadings, but aim for five subheadings at the start.
Each subheading should cover an area of your subject matter and if you can make it a long-tail keyword, even better.
People tend to scan web pages, not read them word by word so your subheadings should also “tell some of the story” if they are just scanned. (Go back and try it on this post.)
The content within a subheading is best kept to between 100 to 300 words.
If you find yourself with too much to write about for one subheading, it’s a good sign that the subheading should be split into two subheadings.
Step 3: Write three informative bullet points for each blog subheading
Technical blogging can be tricky and an easy way to break it down again is to describe the entire sub-topic in bullet points.
This will give you the chance to organise the structure and the flow of the information you are putting into your post.
Each bullet should be one valuable piece of information. If you find that there are too many bullet points for one subheading, split that particular section into two logical subheadings.
Don’t Hold Back on the Information
Don’t hold back on information because you worry the reader will learn enough and not need to hire you or that you’re giving away all of your IP.
Why?
Because there are three kinds of readers in the world:
- Determined DIYers: will never pay to outsource no matter how qualified the expert; so you’ve lost nothing
- Tire-kickers: They’re interested in the content but but are never going to actually hire anyone. Again, nothing lost.
- Researchers: who, once convinced of your expertise, will contact you for help. These are your target.
As long as your content is valuable, helpful and able to be actioned, your blog post will position you as an expert in the field. This does a few very important things:
- Prospects move further along your sales funnel
- Your audience starts sharing your useful content with potential prospects
- Your readers engage with your content with likes and comments
- You get more organic website traffic
- You start conversing with valuable prospects who can turn into leads
- Other experts in your field will link to your content
- You rank higher on Google
Step 4: Write in language that’s easy for your buyer persona to understand
This step is probably the most challenging.
Technical blogging in a language your buyer persona understands takes practice and a deep understanding of your audience.
If you write in technical jargon and insider terms your target persona will very often feel overwhelmed and confused.
Writing simply and clearly is the key: long sentences, big words just for the sake of it, and insider jargon will all alienate your audience.
Ask yourself:
How can I say this as clearly as possible and in as few words as possible.
Step 5: Include Practical Examples and Case Studies
To make your technical blog post more engaging and informative, it’s essential to include practical examples and case studies that demonstrate the real-world application of the concepts you’re discussing.
a. Choose relevant examples
When selecting examples or case studies, ensure they are relevant to your topic and your target audience.
Consider your readers’ level of expertise and choose examples that will be accessible and understandable for them. This may involve simplifying complex concepts or providing background information to help readers fully grasp the example.
b. Explain the examples clearly
Walk your readers through the example or case study, explaining each step or element in detail. Use clear language and avoid technical jargon that may be confusing to your audience. If necessary, break down complex processes into smaller steps to make it easier for readers to follow along.
c. Highlight the key takeaways
After presenting the example or case study, emphasize the main points or lessons that readers should take away from it. This will help reinforce the information and ensure that your audience understands the significance of the example.
d. Connect the examples to your main points
Ensure that your examples and case studies directly support the main points of your blog post. Clearly explain how the example relates to the topic you’re discussing, and use it to illustrate or reinforce your arguments.
e. Use visuals to support your examples
If possible, include images, diagrams, or charts to help illustrate your examples and case studies. This can make the information easier to understand and more engaging for your readers. When using visuals, be sure to provide clear captions and alt text to ensure accessibility for all readers.
Step 6: Link to Authoritative Sites
SEO experts often suggest that you include links in your post to authoritative sites.
(See what I did there!)
It may seem odd to include links to other sites in your post but if you step back a little it makes good sense.
Google wants to send searchers to comprehensive answers to their search queries. If your post contains all the information they are seeking and links to sub-answers it is more likely to completely answer the searchers question.
Just ensure that you use the target=”_blank” modifier for your anchor. This is sometimes shown as “Open in New Tab” in content management systems like WordPress.
This ensures the searcher stays focused on your page and the background information opens in another tab.
(There’s a reason why Facebook links open in a new tab and this is it.)
Outgoing links are great to provide deeper details on a subject that might be important but you don’t have space to explain it in depth in your post. Explaining the meaning of a technical word you’ve used is a good example.
Step 7: Optimize your blog post with tags and meta descriptions
Google uses HTML heading codes (H1, H2, H3, etc) to try to understand the structure of your content, so make sure you use them appropriately.
Don’t just format the text with larger or smaller fonts, bold, etc. That looks fine, but it doesn’t give Google the hints it needs.
Your post should only have one H1 element – and it should be the headline.
Then use H2, H3, and even H4 headings, to logically indicate the sub-sections of the content that you are writing.
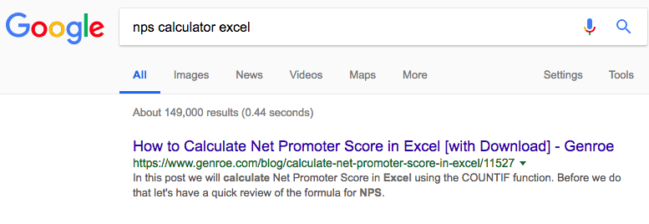
The Title tag (shown in red below) is usually the title of your blog post. Think of it as a newspaper headline; it needs to attract people’s attention.
It also shows up as the heading on the Google search page, so it needs to make sense as a stand alone statement.
Generally 50 to 60 characters long is appropriate and it should contain the main long-tail keyword of your blog post topic.
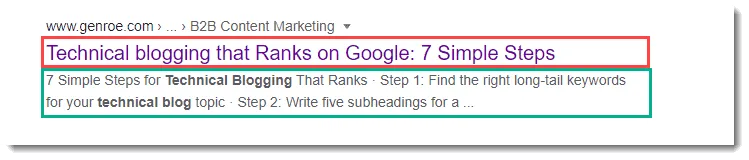
The Title tag of the blog post
The page Description (shown in green) can come from anywhere on the page Google thinks is relevant. However, you also have an approximatively 155 character Description tag that Google often uses for this text.
Think of it as a newspaper sub-heading and try to entice the searcher to click on your listing by describing what they will see on the page.
Keep it short, understandable and place valuable keywords at the front of the sentence where grammatically possible.
Use images and diagrams throughout your post that are relevant to the content and help with the understanding of relevant paragraphs.
Google can’t read images, so place relevant keywords in the image alt text tag. These aren’t seen by the reader but can also help with search engine visibility if prospects search for diagrams related to your content.
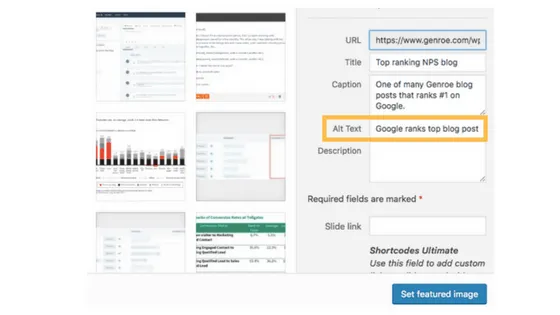
Alt text can be inserted when uploading and saving a new image in WordPress
Step 8: Keep Improving and adding to your blog post
Google like’s new and updated content so a good blog post doesn’t get written once and left.
Read it every few months and update it with:
- Improved language
- New keywords
- New findings within the topic
- Additional information you didn’t think of before
- Updated Links to related blog posts you may write later
Keeping your blog updated increases the likelihood of you maintaining a higher rank on Google, with possibilities to improve its ranking with minimal work.
Originally posted: 1 July 2019. Last Updated:14 April 2023