Easy Steps to Effective Lead Nurture Implementation
Lead nurture campaigns sound straightforward — capture email, send content, hand over to sales. The reality is seven distinct steps, and most teams skip the planning ones and jump to writing emails. Here's a step-by-step lead nurture implementation walk-through using HubSpot workflows, with the segmentation, chronology and review work that decides whether the campaign earns its keep.

On this page
Lead nurture campaigns are built to, you got it, nurture your leads. But what does that actually mean? Well once you’ve put together some gated content and you’ve managed to collect some email addresses from people who are interested in your content, you need to do two things with these new contacts:
- Determine which ones fit into your buyer persona (ie people who you can work with)
- Send them content over a period of time which will move them along the buyer’s journey to the point where they can be handed off to your sales team.
- Keep you top of mind during the long B2B marketing cycle.
This is precisely what a lead nurture campaign does. For the sake of the example, I’m going to use HubSpot workflows in this blog post to better explain how to build a lead nurture campaign but most major B2B marketing automation platforms will have these features.
Where do you start your Lead Nurture Implementation?
We will assume that your website already has a few forms on your website to collect prospect contact details. Be it a newsletter subscription, or gated content.
So the first thing you need to understand, is that once you collect this information, you need to start nurturing your new contacts straight away. To do that in the most effective way, you need to send them information relevant to their needs.
Step 1 – Segment Existing Mailing List
Chances are, you are already sending something generic to your list of contacts. Hopefully, you also have some way of monitoring the open rates and click-through rates of these emails. If you are sending this list a variation of content that covers all your buyer personas and pain points.

The two most important metrics for measuring email success are open rates and click rates.
With this information, you can review your existing newsletter mailing list and determine specific areas of interest for your contacts. Unique characteristics may include but are not limited to:
- pain points
- buyer persona
- areas of the business (types of products and services)
- size of business
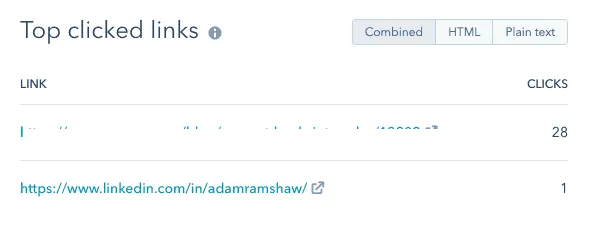
Look into your CRM’s email reports to find out which links are clicked the most to figure out what is working and what isn’t.
It will not be possible to hit all unique characteristics and needs, so select the areas that matter most to them that are relevant to your business, ie hitting the audience that will likely bring the most benefit to your lead nurture implementation.
- Most likely to convert
- Largest margins
- Easiest to serve
- Largest audience in your mailing list
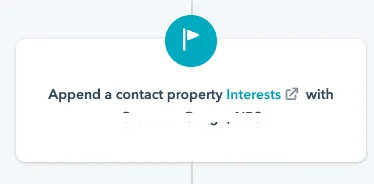
You’ll soon figure out where the greatest interests lie, and once you do, you can tag all your contacts with their interests.
The step shown in the HubSpot workflow

The window to edit the above step.
After adding the relevant tag to each contact, it’s pretty easy to create new contact lists based on interests if want to.
Step 2 – Separate your Existing Content by the Stages of your Marketing Funnel
Review your marketing funnel for each of the segments and separate each stage of the marketing funnel into types of content, i.e. Top of the Funnel (Tofu or Awareness), Middle of the Funnel (MoFu or Consideration), Bottom of the Funnel (BoFu Decision).
To properly gauge where existing content fits into your marketing funnel, remember the three main stages as:
- Awareness – Typically involves content solving smaller problems related to the larger one that you solve. This often involves defining the problem that they may have as they may not know yet. Branding and selling is not yet advised at this stage.
- Consideration – For prospects that know what their problem is and are looking into the solutions available. Content in this stage needs to provide information that helps a prospect to better understand the options available to them. Branding can start to creep in when used in solution comparisons etc. but steer away from sales language.
- Decision – Content in this areas is usually sparse as it’s quite difficult to create content that is good at selling, without scaring prospects away with heavy sales language. This includes special offers, free demos, reviews of their current situation, etc. Content here needs to provide value and can be more focused on your own branding, products and solutions.
Step 3 – Plan your Content Chronologically
After you’ve separated all of your content into the different lead nurtures for each buyer persona and different marketing funnel stages, you can zoom in and look at the individual pieces of content so you can decide what order makes the most sense to the prospect.
You may come to realise that within a lead nurture there are two different topics of interest or types of interest that your prospects can be separated into based on your content. Here’s where you can make a couple of branches and tag your prospects with specific interest. This will allow you to nurture your prospects with more specific content, which will make the lead nurture implementation more effective and targeted.
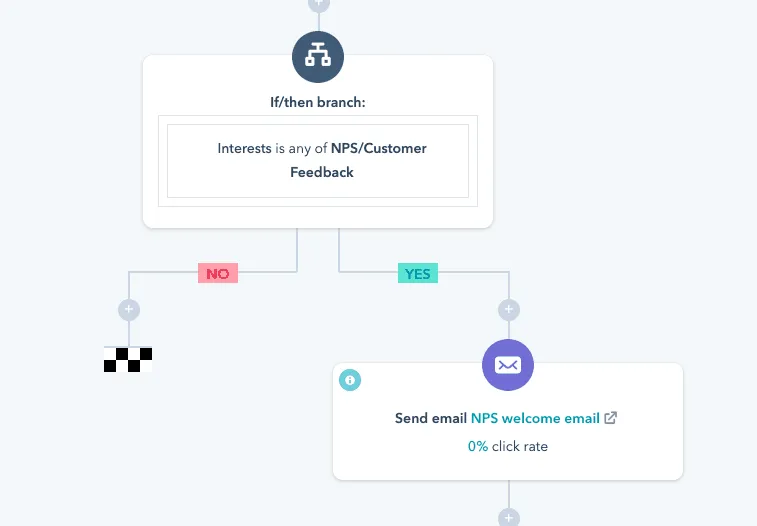
Create branches in your workflow to make content more specific to prospect’s needs and activity.
Tagging your prospects with different interests will also better equip your sales team with the information they need to eventually sell your products and services.
Step 4 – Write your Emails
Here’s where you write an email introducing each piece of content that you want to put into your workflow. Here are a few important things you should put in each email, most of which can be templated in HubSpot or your CRM of choice.
- A meetings link – a feature of good CRM’s that allows you to link straight to a clickable calendar that lets your prospects book an appointment.
- Your company logo and contact information
- The name of the writer of said content and a link to their profile on your company or on LinkedIn.
- A hyperlink to the content
- A well written introduction to the content in question and reasons to read it
Ensure that language is conversational and not salesy. Keep emails relatively brief (no more than 100 words).
Step 5 – Build your Lead Nurture Workflow
Build your workflow with triggers associated with form submission. You may decide that you want to place all of your existing contacts that fit the criteria into the workflow.
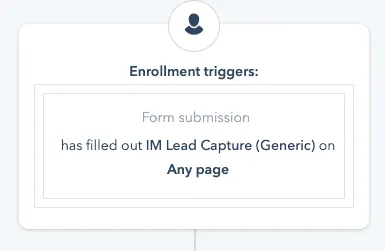
Set an enrollment trigger based on the action of filling out a form.
A seven-day gap between each email is recommended, but you should also consider how many mailing lists each contact is on. Preferably, each contact should only be on one list to prevent them from getting three different emails from your company each week. Over communicating will often lead to an increase in your unsubscribes.
To read about how to score your leads that have been through a lead nurture workflow, check out our blog on lead scoring.
Step 6 – Amping up your content
Once you have built your workflow and added in all the relevant existing content you have, you can look through the flow of content and get a better idea of the experience your prospects will be getting. If it makes sense and you’re happy with the copy and the flow, then you can make the workflow go live.
You may discover, from going through your workflow, that the flow could be improved with the creation of some specific content. Creating this content should not delay the publication of your workflow. So while the workflow is live, you can continue to create content to improve your workflow.
Keep in mind that the first lot of contacts that go through your workflow will take a week before reaching the second email, and up to 4 months to reach the end of this workflow if you have 16 emails in the workflow. So it’s not urgent. You have time to create new content.
When adding a new email to your workflow, you need not pause it. This will complicate the timing of the email sending. Simple add the new email wherever you want and that’s it.
Step 7 – Review and improve your workflow
After a few months (depending on how many contacts go through the workflow and if you get sufficient data, a 3 to 6 month period should do, to make calculated decisions) you can re-evaluate your workflow. This is your opportunity to see where the engagement lies.
The data you should look at includes:
- Open rates
- Click through rates
- Unsubscribe rate
- Top link clicks
You may find that some interests that you thought were important to you, may not be getting much engagement, and that interests that you thought were secondary, need to be prioritised. This often happens as businesses have their own interests and hope that certain areas of their business are more popular as they are easier to sell or execute on. But you need to read the data and take what the numbers say into careful consideration.
Once you’ve been through your first round of lead nurture evaluation, you may decide that the content in Lead nurture one has the wrong priorities. With these learnings, you can build Lead nurture 2. If however, Lead nurture 1 is doing great in helping you learn about your prospects, and thus filtering and tagging them appropriately, you can build lead nurture 2 as a follow up to lead nurture 1.